Friday, November 18, 2011

Soggy Saturday Straw Maze...


Upon becoming disgruntled with having little more to do than climb the miserable four walls while the rain came down outside, Mr four and I got busy with some straws and marbles. This is an easy one and kept aforementioned four year old occupied for at least 45 minutes, which is close to a record. He was so engaged we had to make two!


Begin by rounding up a tray, some sticky tape, scissors, straws and a jar of marbles.


Chop the straws into odd sized bits. Bendy straws work well for making corners. (And, yes, Mr Four is in touch with his feminine side and does appreciate the fine qualities of blue nail polish.)


Now get busy with the sticky. Tape the straws on to the tray in a maze like arrangement, ensuring there are lots of twists and turns to keep it interesting. Then drop in a handful of marbles and get rocking and rolling! We put a folded up face washer underneath ours to prevent overzealous flinging of marbles around the house, it provided just the right amount of cushion-y control.

Tuesday, August 9, 2011

Lolly necklace...


I'm rather sentimental about those little fabric offcuts left after whipping something up on the Janome. This is a cute way to use them up. I made the one above for my two year old, but I quite fancy a grown up version for myself, with more mature, less polka dotty fabric, and more 'lollies'.


Start with these bits. Wooden beads, cord, cotton, needle and precious bits of scrappy fabric...


...cut the cord to your preferred length, allowing enough to tie it up. Tie a loose knot in one end then thread on your beads. I like an odd number, spaced at odd intervals, because I am a little odd and too much symmetry makes me queasy...


...cut a piece of fabric in a square, four times the width of the bead...


...thread your needle and knot the end. Wrap the first of your beads in it's little blankie then sew through the fabric and cord at one end of the bead. This will stop the 'lolly' sliding along the cord. Wrap the cotton around the end a few times, as shown, then fasten off. Do the same on the other end so you've got a happy little lolly bonbon...


...do the same on each of your beads, spacing them as you go. Tie the ends of your necklace together and slip it over your head. Have a look in the mirror. Ever so fetching, don't you think?
If you fancy, you can vary things like the fabrics, length of the cord, number and size of the beads and the gaps between them. Now, excuse me while I toddle off and make one for ME!

Monday, July 25, 2011

Early bloomers...


Paper towel doesn't generally cheer me up. However, get a bit crafty with the stuff and spring will arrive early!


Start with some paper towel squares cut into quarters. You can get a bit tricky and cut a few circles (or dodecahedrons if you are truly loopy). Also gather to the fray, some tape, food dye and pipe cleaners (or wire, or skewers, or straws). Anything that would work as a flower stem will do...


...twist your squares, circles and dodecahedrons to look like little blossoms, as shown...


...then dip the pointy ends of each into some food dye that you've mixed with a bit of water. Quickly in, then out is best to avoid a handful of soggy mush and to retain a lovely white edge...


...once they've dried (in front of the heater for impatient types like myself) tape each little bloom onto it's stem. We had banana yellow pipe cleaners in abundant supply, so we used those...


...bundle them into a little posy or massive bouquet (if you had so much fun you used the whole roll of paper towel). Then plonk them into a vase, no water required, and admire their happy little papery faces smiling at you, because they think they're the real thing!
As usual, you can of course up the ante. I'd try double dipping, one colour on the pointy end then another on the frilly end. They'll blend where they meet and look all tie dyed and lovely.
I also pondered the idea of taping some stamens in when attaching them to their stalks. Maybe use tooth picks with dip dyed tips, fine strips of coloured paper, or get some of those little fake ones from a craft shop.
Oh, and glitter makes most things better, especially if you are a girl under ten. Perhaps, some glue around the upper frilly edges then dip them generously in the stuff. Hmmmm, I'm almost inspired to have another whizz at them myself...

Sunday, July 10, 2011

Flutterby Bunting...


Remember those butterfly prints everyone did in grade prep? I've taken them on a little journey so they can experience a life beyond being stuck to the fridge with a magnet from Sea World.


Start by squidging, slopping and smudging some paint on a piece of paper...


...fold it in half and smooth it all over with your hands...


...open it out then ooh and ahh at the pretty colours. Continue to make more until you lose interest or run out of paint and paper, then leave them all to dry...


...get busy with some scissors and cut them all out. Use a bit of creative license so they look more butterfly-ish than splodgy...


...cut a piece of string to a length which is proportionate to the number of butterflies you have. Sticky tape each butterfly to the string as shown, leaving a gap between each...


...spend several hours cursing as you untangle them, them hang them all lovely in a location of your choice.
I think they'd be even nicer if you convince any junior Clever Hands participant that less is more in regards to colour choice and limit the range. I think they'd be princess pretty in pastels and for the really girly girls you could sprinkle liberally with glitter and sequins. Exercising some fine motor skills and making tiny little butterflies would add to the cutesy, too. Have fun!

Wednesday, June 29, 2011

Muddy mug pudding...

There's minimal dish washing, it takes about two minutes in the microwave and is ooey, gooey, super yum. You could make enough mugs for the family, but sometimes it's nicer not to share...


Ingredients-
1 tbs butter
1 tbs brown sugar (+1 tsp extra)
1 tiny egg from a weeny chook (or beat a big one and only use half)
1 tbs SR flour
1 tbs cocoa (+ 1 tsp extra)
3 tbs hot water
Cream, to serve


Start by softening the butter in the microwave (20 seconds does the trick) then mix in the brown sugar. Mix the egg in well...


...add the SR flour and cocoa and mix it all to a thick batter...


...it should look bit like this...


...sprinkle on the extra cocoa and brown sugar then pour over the hot water. Put it on some paper towel because it WILL chuck a wobbly all over your microwave, especially if the mug is a bit undersized...


...give it the whizzy ride of it's short life in the microwave for 1 minute. It should be ready but if you want a bit less gooey-ness, give it another minute...


...guild the lily by slopping in the cream then find a secret, quiet spot and scoff the lot!

Tuesday, June 28, 2011


-------------------------------------------

Happy Hats...


Here's a birthday inspired one created in last minute land when party hat stocks had run out.
Please note - the following activity requires no glue or paint and is therefore suitable for frantically busy households and frazzled, unravelled Mummies...


Start with a head sized cardboard band, stapled together at the ends...


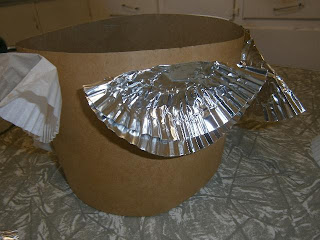
...upend your pantry and find the cup cake papers. Fold a few in half, so they look like little fans...


...staple the cup cake fans around your Happy Hat, taking care not to staple on any stray digits...


...if you're three, it should look a bit like this...


...and a bit like this if you're me...


...and if you just can't leave it alone, get the scissors out and cut a fancy pattern around the edge.
It might be also worth sticky taping the backs of the staples so they don't scratch.
Now, take a deep breath, light the candles and..."Happy Birthday to you................"
Alternatively, I reckon you could fashion quite the crown for your little prince or princess using the same techniques.


-----------------------------------------


Fun with Fallen leaves...

Just before we dive headlong into a long cold winter, get the kids out in their gummies and collect the last of those glorious red, gold and orange leaves and make this leafy, toowit toowoo-ing windowsill friend! (and don't worry about having to find a permanent home for him alongside all that other kiddie craft...his leaves will soon turn crispy and fall off. Sweep them up and farewell him to the rubbish truck fairies!


Start by bringing your leaves in on a tray for a warm and dry by the heater...


...then scrunch up a few pages of yesterdays news...


...wrap them up so your owl is a little present...


...tape his bum up...


...then sit him on it and tape up his top...


...tape on some twiggy leggies...


...now, scrunch or roll a bit of sticky tape so the sticky is on both sides like double sided tape. Stick it to the back of a leaf, then stick the leaf to your owl...


...working your way up from the bottom and around his sides and back, cover him in feathery loveliness...


...put two leaves on top like ears then find yourselves something for eyes. We used old cardboard ribbon rolls which we glued on to some paper, then cut around. We then scrunchy, sticky taped two buttons to this paper to give "Busby" a whimsical, wise expression. You could also use a chopped toilet roll, some cup cake papers or hand drawn eyes...get creative and make yours a bit spesh...

Have fun!